
TL;DR
A closet rig isn’t truly soundproof, but strategic placement and treatment can dramatically reduce noise. Focus on where the sound travels first, seal gaps, and ventilate properly. A well-placed, ventilated closet setup can be nearly silent and sound great.
Ever tried recording in a tiny closet and wondered why it still sounds echoey or leaks noise? That’s because most folks focus on foam panels or blankets, thinking it’s enough. But the real game-changer is **where you place your gear and how you manage sound transfer**. Moving your rig into a closet can cut noise by 90%—if you do it right.
This article breaks down the most effective strategies for dampening, placement, and creating a quiet, functional closet studio. No fluff—just real, actionable advice that makes your space sound better and stay quiet.
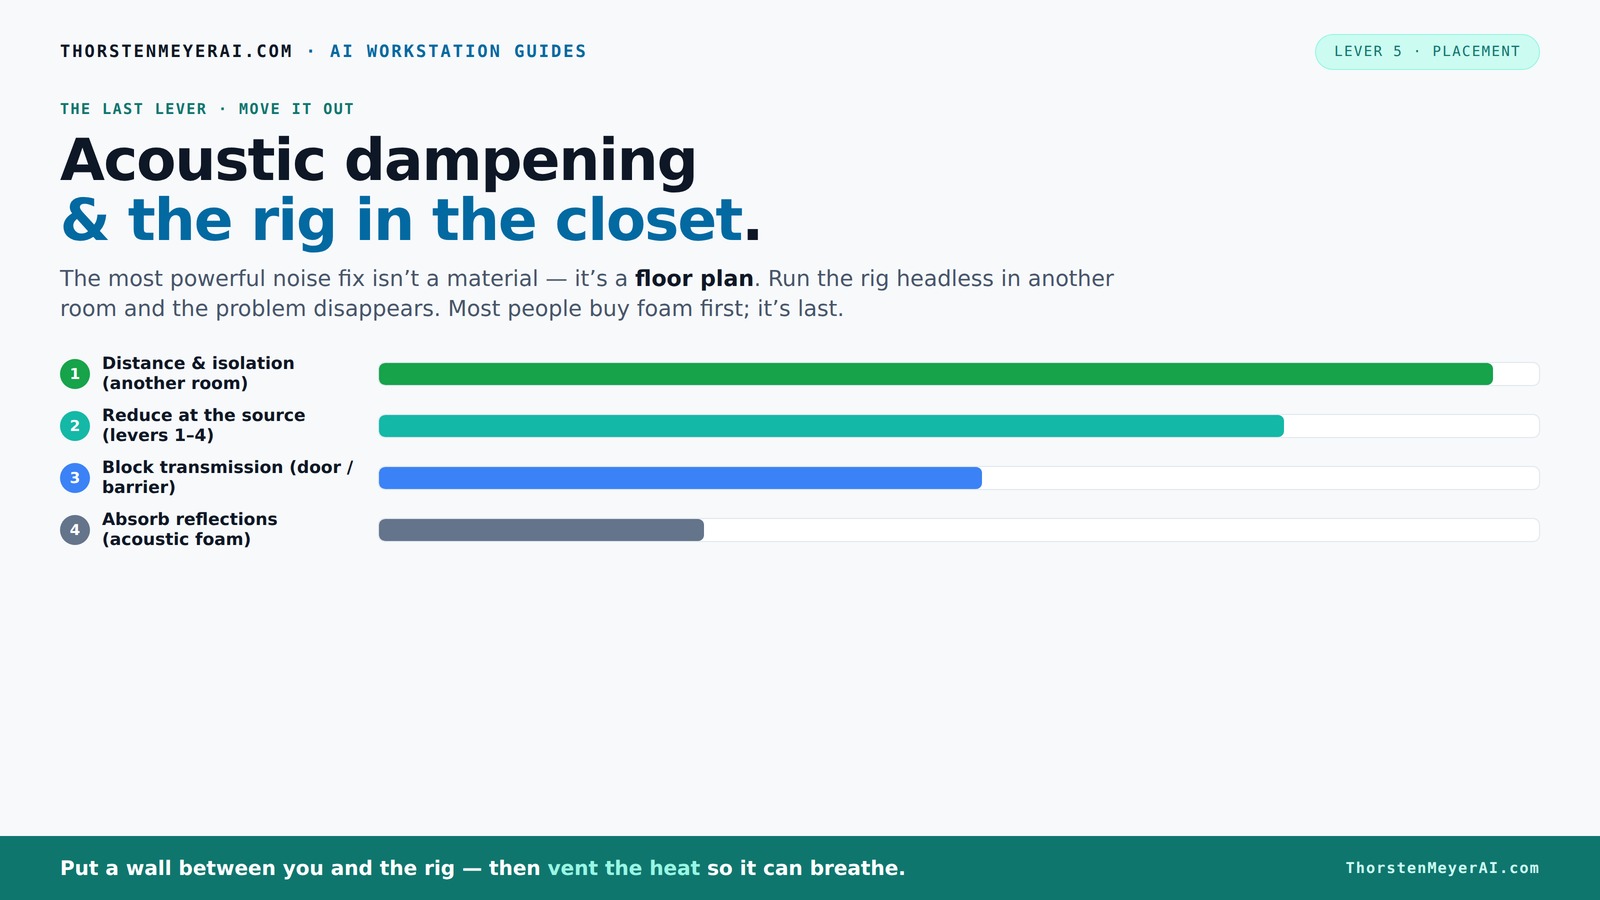
Acoustic dampening
& the rig in the closet.
The most powerful noise fix isn’t a material — it’s a floor plan. A rig you can’t hear because it’s in another room beats any amount of foam. Tap the approaches in Part 1 to see what actually works.
(another room)
(levers 1–4)
(door / barrier)
(acoustic foam)
Contain the noise, not the heat
Key Takeaways
- Moving your rig into a separate room or closet drastically reduces noise—it's the most effective fix. Learn more about optimizing your setup.
- Proper ventilation is crucial—sealed closets trap heat and can damage your hardware; use fans or ducting.
- Identify and treat the first reflection points with thick panels or blankets for clearer recordings.
- Seal gaps around doors and vents—these are the main escape routes for sound.
- Combine foam panels with blankets and bass traps for a balanced, low-cost acoustic environment.
12 Pack Self-Adhesive Acoustic Panels, 12" X 12" X 0.4" High-Density Sound Proof Foam Panels for Walls, Soundproof Wall Panels for Home & Office (Black)
Superior Noise Reduction & Echo Cancellation - Tired of background noise and poor acoustics? Our soundproof wall panels...
As an affiliate, we earn on qualifying purchases.
As an affiliate, we earn on qualifying purchases.
Why Moving Your Rig Is the Most Powerful Noise Fix
Moving your AI workstation or audio rig into a different room is the easiest way to silence it. Think of it as giving your noise a barrier that’s almost impossible for sound to pass through. When you’re working remotely or over a network, the physical location of the rig doesn’t matter much anymore.
For example, I set up my GPU in a spare closet on the other side of my apartment. I SSH in, and my workspace stays silent. The roar, the hum? Completely out of earshot. This approach beats any foam or treatment because it removes the problem at its source.
All you need is a reliable wired connection and some ventilation to keep things cool. This simple fix saves hours of fuss trying to dampen sound that’s essentially traveling through the air or walls.

Focusound 52 Pack Acoustic Foam Panels 1" x 12" x 12" Sound Proof Foam Panles Soundproofing Noise Cancelling Wedge Panels for Home Office Recoding Studio with 300PCS Double-Side Adhesive
Soundproofing - Acoustic foam panels triangular grooves structure for better noise absorption, helps to reduce and absorb unwanted...
As an affiliate, we earn on qualifying purchases.
As an affiliate, we earn on qualifying purchases.
The 'Rig in the Closet' Setup — How to Do It Right
Putting a powerful, heat-producing machine in a closet sounds ideal—quiet and out of sight. But heat buildup is the enemy of a 24/7 rig. Without proper airflow, trapped heat will throttle your hardware and make fans scream.
To avoid cooking your gear, you need active ventilation: a small exhaust fan, vents, or ducted airflow. The goal: let hot air escape while cool air enters. For example, a simple setup with a quiet exhaust fan and some vents kept my GPU happy and cool, even during heavy training runs. See detailed ventilation strategies here.
For serious silence plus safety, consider a purpose-built soundproof cabinet with temperature sensors, ducting, and controlled airflow. Check out [this guide](https://thorstenmeyerai.com/reduce-heat-noise-ai-workstation/) for detailed ventilation strategies.

TroyStudio Portable Vocal Booth, Large Foldable Microphone Isolation Shield, Music Recording Studio Sound Echo Absorbing Box, Desk & Stand Use Reflection Filter with Thickened Dense Acoustic Foam
【BASIC INFO】: Inside size after setup: 8'' (L) X 10'' (W) X 12'' (H), large space for various...
As an affiliate, we earn on qualifying purchases.
As an affiliate, we earn on qualifying purchases.
Placement & Reflection Control: The Secret Sauce
Sound doesn’t just escape; it bounces around—especially in small spaces. The key is to control reflections at the source. Start by placing your microphone and speakers carefully. For more tips, visit our guide on acoustic treatment.
Next, treat the first reflection points—these are the spots where sound hits the wall and bounces back to your ears or mic. Use a mirror to find these spots: sit in your usual setup, hold a mirror against the wall, and note where the reflection of your mic or speakers is visible. Cover those areas with foam or blankets.
Thick panels (2-4 inches) absorb lower frequencies better, especially in small rooms. For example, adding a few thick foam panels around my mic’s reflection point reduced echo and made my recordings sound crisp and clear.
Focusound 52 Pack Acoustic Foam Panels 1" x 12" x 12" Sound Proof Foam Panles Soundproofing Noise Cancelling Wedge Panels for Home Office Recoding Studio with 300PCS Double-Side Adhesive
Soundproofing - Acoustic foam panels triangular grooves structure for better noise absorption, helps to reduce and absorb unwanted...
As an affiliate, we earn on qualifying purchases.
As an affiliate, we earn on qualifying purchases.
Seal Gaps & Control Sound Leakage—Don’t Skip This Step
Sound leaks through gaps, cracks, and open doors way more than through treated walls. Your first priority: seal every crack around the door with weatherstripping or acoustic seals. For detailed tips, see soundproofing guides.
Check for gaps where cables pass through, and seal those with gasket or foam grommets. Even small cracks act like tiny speakers, radiating sound into your space.
Remember, a tight seal on doors and gaps controls the majority of noise escape—treat these as the foundation of your setup. For detailed tips, see [soundproofing guides](https://www.soundproofcow.com/how-to-soundproof-closet/).
Foam, Blankets, or Both? What Works Best in a Closet?
Acoustic foam is designed to absorb sound reflections, but in small spaces, thicker and more flexible materials like blankets often work just as well. For example, I layered moving blankets over the closet walls before adding foam panels, and the reduction in echo was dramatic.
Use a mix: foam panels on reflection points and blankets to cover larger surfaces or hard floors. A common DIY trick is hanging blankets from the ceiling or walls—these can cut reverb without deadening your space completely.
The takeaway: don’t rely solely on foam; combine it with soft materials for the best result in a tiny room.
Bass Traps & Low-Frequency Control in Tiny Spaces
Low-end buildup is common in small rooms because standing waves form easily. If your recordings sound boomy or boxy, consider adding bass traps in the upper corners of the closet. For more on acoustic treatment, visit our resource on soundproofing.
For example, after installing small bass traps in my closet’s upper corners, the low-frequency muddiness disappeared, and my recordings gained clarity.
In tiny spaces, even lightweight traps can make a real difference, especially if you notice uneven frequency response or “thumpiness.”
Vibration & Mechanical Noise: The Hidden Culprits
Sound isn’t just about air vibrations—mechanical vibrations transfer through surfaces. If your rig vibrates the desk or floor, it can produce low-frequency noise that’s hard to isolate with foam alone. For DIY solutions, see our guide on vibration control.
For instance, placing rubber grommets on my PC’s stand reduced the hum and rattles that seemed to come from the desk itself. This is especially true for larger rigs or setups with spinning drives and fans.
Remember: isolating vibrations complements acoustic treatment, giving you a cleaner, quieter environment.
Practical DIY Tips & Budget-Friendly Solutions
Good soundproofing doesn’t mean spending a fortune. Start by sealing gaps, then layer blankets and foam strategically. Use closet shelves or hanging racks to hang blankets, and stack foam panels on reflection points. For example, I built a simple booth with leftover moving blankets and a few foam tiles—cost less than $100 and worked wonders.
Combine low-cost materials with smart placement: keep noisy components away from the door, and always prioritize reflection points first.
In a pinch, even thick towels or rugs can help tame echoes in a small space.
Frequently Asked Questions
Is a closet booth actually soundproof?
Not completely. Most closet setups are more about reducing echoes and leakage than strict soundproofing. Sealing gaps and adding mass helps, but total soundproofing requires specialized construction.
What’s the difference between acoustic treatment and soundproofing?
Acoustic treatment reduces echoes and reflections inside a space, making sound clearer. Soundproofing prevents sound from entering or leaving the space. They serve different purposes but often work best together.
Where should I place the mic in a closet studio?
Position your mic facing the wall or reflection points, not directly at the corner. Use a mirror to find the first reflection points and treat those spots for cleaner recordings.
Should I treat the walls, ceiling, or door first?
Start with sealing gaps around the door and walls, then focus on reflection points on the walls. Ceiling treatment comes next if echo persists. Gaps are usually the biggest sound leak source.
How thick should acoustic panels be?
Thicker panels (around 4 inches) absorb lower frequencies better, especially in small rooms. For most home setups, 2-3 inches is a good starting point, with thicker panels for bass traps.
Conclusion
The biggest leap in creating a quiet, professional closet rig isn’t just more foam—it’s smart placement, sealing gaps, and controlling heat. When you move your gear into a well-ventilated closet or another room, you cut out most of the noise at its source.
Imagine your workspace silent, your recordings crisp, and your stress level down. Start with where your gear sits, then treat the reflections—your perfect home studio is within reach.